Implement Rest WCF service in SharePoint 2010
This is my first blog of my life so please bear with me for any
mistake, I would like to show you how you can implement REST WCF service in
your Sharepoint 2010 solution. Before going ahead, We need to intall CKSdev tool for SharePoint 2010 so we can use SharePoint Service factory to handle the instance of our service.
Download CKSdev URL : http://visualstudiogallery.msdn.microsoft.com/8e602a8c-6714-4549-9e95-f3700344b0d9/
http://cksdev.codeplex.com/
You can find more out CKSdev tool on http://blogs.code-counsel.net/Wouter/Lists/Posts/Post.aspx?ID=156
Download CKSdev URL : http://visualstudiogallery.msdn.microsoft.com/8e602a8c-6714-4549-9e95-f3700344b0d9/
http://cksdev.codeplex.com/
You can find more out CKSdev tool on http://blogs.code-counsel.net/Wouter/Lists/Posts/Post.aspx?ID=156
Now, Lets start the actual implementation
1. Create new SharePoint 2010 project in visual studio 2010 and use "Empty SharePoint Project" template for this. We can give solution name like "SharePoint2010RestWCFServiceSolution".
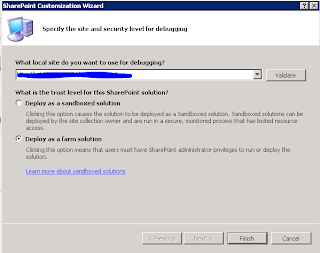
2. In SharePoint Customization Wizard dialog box provide site URL in the give input area and select "Delpoy as a form solution" option. Then you can validate the given site url
3. Once validation will complete, you will get the "Connection Successful" popup on this screen. Press "OK" then You can press "Finish" button.
4. Create new SharePoint project using "Empty SharePoint Project" template and named as "WCFService"
5. Now, open solution Explorer and do right click on your add WCF project. Browse the context menu for Add option and explore the option. there, you will find "SharePoint Mapped Folder..." click on that and map the ISAPI folder from SharePoint hive 14
6. Add a sub folder inside the ISAPI folder named as "WCFService"
7. Add a text file in the folder "WCFService" named as "Service.svc"
8.Right click on Service.svc file and choose HTML Editor by choosing Open with ..... from context menu
9. Now Add existing Service factory of the SharePoint to handle the instance of service for us
10. You need to generate your public token key of the assembly. To generate token key you can follow below steps.
a. Click on tool menu in Visual Studio 2010
b. Go on External Tool and Click, One dialog box will appear infront of you then Add New title name as your wish
c. In command section C:\Program Files (x86)\Microsoft SDKs\Windows\v7.0A\Bin\sn.exe
d.Set Arguments parameter as -Tp $(TargetPath)
e. Checked option "User outPut Window"
f. Now You will get you Get SN Key in tool Menu. Once you will click on this menu you can see your assembly public key in output window as depicted below
11. Add required assembly references in your solution like
- Microsoft.SharePoint.Client
- Microsoft.SharePoint.Client.ServerRuntime
- Microsoft.SharePoint.Client.Runtime
- System.ServiceModel
- System.ServiceModel.Web
- System.Runtime.Serializatrion
12. Create a Folder named "WCFObject" in the WCFService solution and add a new class for your properties named as "clsMyProperties".
13. Create a interface in solution for the service named as IService.cs and write below mentioned code
14. Add a new Class named as Service.cs. Here, You can do implementation interface method (OperationContracts)
Note : Use only
15. Just build you project and deploy. Now you are ready to consume your created REST WCF service.
16. Add a Web part in "SharePoint2010RestWCFService" solution named as webpart simple.
17. Add Jquery.js file in your project in mapped Layout folder : download url http://jquery.com/
18. Add below mentioned line below the title tag in your web part
<script type="text/javascript" src="../_Layout/jquery-1.7.1.min.js"></script>
19. Create HTML structure as given below in screenshot.
20. Add below mentioned code in <script></script> tag.
21. build and deploy your the solution.
22. Create a new page in the site named as "RestWCFpage" and add the create webpart from the custom categories in Insert tag of the page.
You can see the resultant data on UI.
for more details you can go through this URL http://msdn.microsoft.com/en-us/library/ff521581.aspx


No comments:
Post a Comment